React Compiler를 직접 사용해보기 🎶 (with. next 15)
복잡한 React 컴포넌트를 작성할 때, 은근 골치아픈게 memo, useMemo, useCallback과 같은 최적화이다.
물론, 최적화에 신경쓰지 않는다면 안써도 되는 경우도 많지만.
useEffect 내부에서 상태를 변화시키는 함수를 호출시키는 경우에 이 함수는 useCallback으로 감싸져야 하며, 때때로 조건부 렌더링 컴포넌트는 memo로 최적화 시켜야 무한 렌더링을 방지할 수 있는 등등 여러 경우에 이런 최적화 코드는 필수가 될 때가 있다.
(lint가 함수를 새빨갛게 표시하는 순간, useCallback을 써야하는 상황이라는 걸 바로 알 수 있다.... 💧)

때문에!
React 19 버전의 발표를 유심히 본 사람들이라면, React Compiler의 존재를 보고 매우 기뻤을지도 모른다.
(그리고 글을 쓰는 와중에 Reac 19가 stable로 발표되었다 👻 2024/12/05)
https://react.dev/blog/2024/12/05/react-19
React v19 – React
The library for web and native user interfaces
react.dev
다만, 위의 19 블로그 글에는 react compiler에 대한 내용은 포함되지 않았다...
https://react.dev/blog/2024/10/21/react-compiler-beta-release
React Compiler Beta Release – React
The library for web and native user interfaces
react.dev
리액트 블로그에 2024년 10월 21날 올라온 글이다!
안타깝게도 아직 베타버전이지만, 리액트 컴파일러가 뭔지 자세히 알려주고 있다.
한줄 요약하자면,
memo, useCallback, useMemo를 작성하지 않아도, 이제는 알아서 최적화를 해준다 🫢
이제는 위의 코드들은 사용할 일이 없다. (react 19에서는)
다만, 요즘은 많은 리액트 프로젝트들이 기본적으로 next로 설정된다.
따라서, next에서 이 react compiler를 지원해줘야 하는데, 때마침 next.js 15 버전이 위의 블로그 글과 함께 21일날 출시되었기에 next에서도 리액트 컴파일러를 사용할 수 있다 👍
Next 15를 사용해서 React Compiler 사용하기 🙌
그리고, 글만 보기보단 직접 리액트 컴파일러를 설정해보고 실제 useCallback이 필요한 상황에서 useCallback없이도 에러 없이 잘 동작하는지 확인해보기로 했다.
역시 가장 먼저 해야될 일은 next 15 프로젝트의 시작이다. ✨
현재 next 15가 stable이기 때문에 다음과 같이 명령어를 쳐주면 된다.
npx create-next-app@latest practice-next-15
참고로, stable이 아닌 버전은 canary 라고 하는데, create-next-app@canary 를 프로젝트를 사용해 생성할 수 있다.
만약 기존의 next 14에서 15로 업그레이드를 하고자 한다면, 다음의 문서들을 확인해보자.
Next.js 15
Upgrading from 14 to 15
- next에서는 codemode로 간단하게 업그레이드할 수 있다.
npx @next/codemod@canary upgrade latest
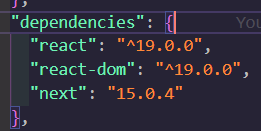
생성한 next 프로젝트 package.json을 확인해보면, next 15.0.4 기준으로 react 19 버전이 설정된다.

프로젝트 생성이후 next.config.js 파일에 가보자.
그리고 react compiler를 활성화 시킬 수 있다.
다만, 아직 베타 버전이기에 실험적인 기능에서 활성화시킨다.
import type { NextConfig } from 'next'

 /** @type {import('next').NextConfig} */
const nextConfig: NextConfig = {
  experimental: {
    reactCompiler: true,
  },
}

export default nextConfig
https://nextjs.org/docs/app/api-reference/next-config-js/reactCompiler
next.config.js Options: reactCompiler | Next.js
Enable the React Compiler to automatically optimize component rendering.
nextjs.org
요렇게 reactCompiler: true 만 설정하면 될 것 같지만...
아직 베타 버전이라서 그런지 babel plugin을 수동으로 설치해줘야 한다.
npm install -D babel-plugin-react-compiler eslint-plugin-react-compiler
lint에서 useCallback을 쓰라고 하면 안되기에 eslint 플러그인도 함께 설치해주자.
eslint 설정은 react 공식 홈페이지에서 확인할 수 있다.
https://react.dev/learn/react-compiler#installing-eslint-plugin-react-compiler
React Compiler – React
The library for web and native user interfaces
react.dev
코드만 가져오면,
import reactCompiler from 'eslint-plugin-react-compiler'

export default [
  {
    plugins: {
      'react-compiler': reactCompiler,
    },
    rules: {
      'react-compiler/react-compiler': 'error',
    },
  },
]
이렇게 설정하면 된다.
next로 생성하면 .eslintrc.json 파일인데, 이 경우엔 다음과 같이 plugins와 rules를 설정해주자.
{
  "extends": ["next/core-web-vitals", "next/typescript"],
  "plugins": ["react-compiler"],
  "rules": {
    "react-compiler/react-compiler": "error"
  }
}
이제 설정은 끝났다 👻
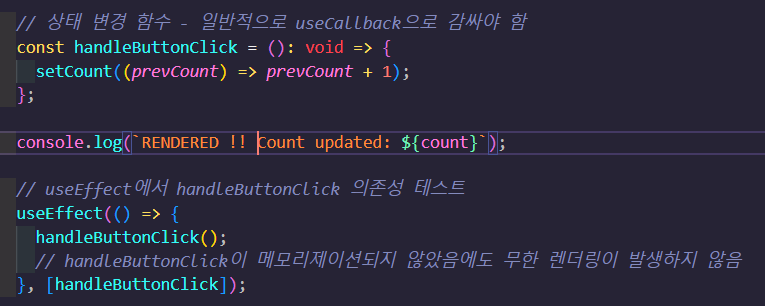
이제 확인할 것은 진짜로 useCallback이 필요한 (useEffect 내부에서 상태를 변경하는 함수를 호출했을 때, dependency로 함수가 걸리고, 이 함수가 메모라이제이션이 되야하는...) 상황에서 useCallback 없이 잘 작동하는지이다.
이를 위해서 예제를 만들어보자!
"use client";

import { useState, useEffect, JSX } from "react";

export default function ReactCompilerTest(): JSX.Element {
  const [count, setCount] = useState<number>(0);
  const [text, setText] = useState<string>("");

  // 상태 변경 함수 - 일반적으로 useCallback으로 감싸야 함
  const handleButtonClick = (): void => {
    setCount((prevCount) => prevCount + 1);
  };

  console.log(`RENDERED !! Count updated: ${count}`);

  // useEffect에서 handleButtonClick 의존성 테스트
  useEffect(() => {
    handleButtonClick();
    // handleButtonClick이 메모리제이션되지 않았음에도 무한 렌더링이 발생하지 않음
  }, [handleButtonClick]);

  return (
    <div style={{ fontFamily: "Arial", margin: "20px" }}>
      <h1>React Compiler Test</h1>
      <p>Current Count: {count}</p>
      <button
        onClick={handleButtonClick}
        style={{ padding: "10px 20px", marginRight: "10px" }}
      >
        Increment Count
      </button>
      <input
        type="text"
        value={text}
        onChange={(e) => setText(e.target.value)}
        placeholder="Type something..."
        style={{ padding: "10px" }}
      />
    </div>
  );
}
클라이언트 컴포넌트로 작성한 위의 코드는 원래대로라면 handleButtonClick에 useCallback이 필요한 코드이다.
그렇다면, 실제로는 잘 작동할까?
eslint가 적용되지 않았을 때, 위의 코드는 다음과 같은 경고가 나타난다.

render의 문제가 발생하니, useCallback을 사용하라고 경고하고 있다.

실제로 react compiler를 설정하지 않은 상태에서는 무한 렌더링 문제가 발생한다.
lint 설정을 해주면, 코드에서 에러 메세지가 사라진다.
그리고 next.config.js의 설정을 해준뒤, 다시 무한 렌더링이 발생하는지 확인해보면 !
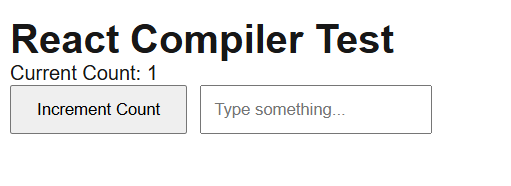
단 한번만 실행이 되며 무한 리렌더링은 발생하지 않았다 👍
진짜로 React 19에서는 메모이제이션이 이젠 필요없게 되었다.

직접 작성한 코드는 아래 레포에서 확인하실 수 있습니다 👍
https://github.com/citron03/practice-next-15
GitHub - citron03/practice-next-15: Practice React 19, Next 15 (with react compiler)
Practice React 19, Next 15 (with react compiler). Contribute to citron03/practice-next-15 development by creating an account on GitHub.
github.com