


PWA는 프로그레시브 웹 앱의 줄임말로, 요즘 브라우저 기반으로 서비스를 제공하는 경우 많이 적용되어있는 기술이다.
(스타벅스, notion, AliExpress, 스포티파이 등등)
단순하게 생각하면, 웹 사이트인데 윈도우 App이나 맥 App처럼 바로가기를 만들 수 있는 등 어플리케이션 같은 기능을 제공해주는 웹 사이트다.
(즉, 네이티브 앱처럼 동작하도록 만들어진 웹 앱 & 설치 가능한 웹사이트)
💘 PWA의 주요 특징은 다음과 같다.
| 📱 설치 가능 | 크롬이나 사파리에서 "홈 화면에 추가"로 앱처럼 설치 가능 |
| 🔌 오프라인 지원 | 네트워크가 끊겨도 일부 기능 사용 가능 (서비스 워커 덕분) |
| 🚀 빠른 로딩 | 캐싱 덕분에 다음 방문 시 로딩 속도 빠름 |
| 💬 푸시 알림 | 백그라운드에서도 사용자에게 알림 전송 가능 (조건 있음) |
| 🧭 앱처럼 동작 | 전체화면, 아이콘, splash 화면 등 완전 앱 UI 가능 |
글로벌 웹 서비스의 웹사이트들은 보통 PWA가 설정되어 있기에, 나도 한번 PWA를 어떻게 설정할 수 있는지 해보기로 했다.
이번에는 Next.js 15, App Router 환경에서 PWA(Progressive Web App)를 설정하는 방법을 정리해 보았다.
next-pwa라는 라이브러리가 있어서 간단하게 설정하는 방법들이 많이 소개되었는데, 해당 라이브러리의 마지막 버전이 2022년 8월이라서... 그냥 해당 라이브러리 없이 설정하기로 했다.
https://www.npmjs.com/package/next-pwa
next-pwa
Next.js with PWA, powered by workbox.. Latest version: 5.6.0, last published: 3 years ago. Start using next-pwa in your project by running `npm i next-pwa`. There are 85 other projects in the npm registry using next-pwa.
www.npmjs.com
✅ manifest.json 설정
PWA에서는 manifest.json이 필수이다.
일단 public/manifest.json 파일을 생성하고 아래 내용을 추가도록 하자.
{
  "name": "My PWA App",
  "short_name": "PWA App",
  "start_url": "/",
  "display": "standalone",
  "background_color": "#ffffff",
  "theme_color": "#000000",
  "icons": [
    {
      "src": "/icon-192x192.png",
      "sizes": "192x192",
      "type": "image/png"
    },
    {
      "src": "/icon-512x512.png",
      "sizes": "512x512",
      "type": "image/png"
    }
  ]
}- display: "standalone"을 설정하면 앱처럼 동작하도록 설정할 수 있다.
- icons 설정을 추가하면 크롬에서 PWA로 인식할 수 있다.
✅ middleware.ts에서 Content-Type 설정
Next.js 15에서는 middleware.ts를 사용하여 manifest.json의 Content-Type을 명확히 설정해야 한다.
프로젝트 root에 middleware.ts파일을 추가하고 다음과 같이 작성해주자.
import { NextResponse } from "next/server";
import type { NextRequest } from "next/server";

export function middleware(req: NextRequest) {
  if (req.nextUrl.pathname === "/manifest.json") {
    return new NextResponse(
      JSON.stringify(require("./public/manifest.json")),
      {
        headers: {
          "Content-Type": "application/manifest+json",
        },
      }
    );
  }
  return NextResponse.next();
}
Content-Type을 application/manifest+json으로 명확하게 설정해야 크롬에서 정상적으로 인식한다.
✅ service-worker.js 추가
PWA에서는 서비스 워커(Service Worker)를 등록해야 한다.
public/service-worker.js 파일을 생성하고 아래 내용을 추가하자.
- public/service-worker.js
const CACHE_NAME = 'my-pwa-cache-v1';
const OFFLINE_URL = '/offline.html';

self.addEventListener('install', (event) => {
  event.waitUntil(
    caches.open(CACHE_NAME).then((cache) => {
      return cache.addAll(['/', OFFLINE_URL]);
    }),
  );
  console.log('✅ 서비스워커 설치 완료');
});

self.addEventListener('fetch', (event) => {
  // navigation 요청에만 offline 대응
  if (event.request.mode === 'navigate') {
    event.respondWith(
      fetch(event.request).catch(() => {
        return caches.match(OFFLINE_URL);
      }),
    );
  }
});- install 이벤트에서 오프라인 캐싱을 설정한다.
- fetch 이벤트에서 네트워크 요청이 실패하면 캐싱된 페이지를 제공한다.
offline의 경우를 대응하기 위해서 offline.html 파일을 만들어주자. (pwa에서는 친절하게도 오프라인에 경우에도 대응할 수 있다 💘)
- offline.html
<!-- public/offline.html -->
<!DOCTYPE html>
<html lang="ko">
<head>
  <meta charset="UTF-8" />
  <meta name="viewport" content="width=device-width, initial-scale=1.0" />
  <title>오프라인 상태입니다</title>
  <style>
    body {
      margin: 0;
      font-family: sans-serif;
      background-color: #f2f2f2;
      color: #333;
      display: flex;
      justify-content: center;
      align-items: center;
      height: 100vh;
      text-align: center;
    }
  </style>
</head>
<body>
  <div>
    <h1>📴 오프라인입니다</h1>
    <p>인터넷에 연결되어 있지 않아 페이지를 불러올 수 없습니다.</p>
    <p>다시 연결되면 자동으로 복구됩니다.</p>
  </div>
</body>
</html>
✅ app/layout.tsx에서 서비스 워커 등록
Next.js App Router에서는 클라이언트 전용 코드와 서버 전용 코드를 분리해야 한다.
그리고 서비스 워커는 클라이언트에서만 실행되므로 useEffect를 활용해야 한다.
(때문에 RSC에서는 별도의 컴포넌트를 만들어주는게 좋다)
- app/components/EnablePwa.tsx
'use client';

import { useEffect } from 'react';

export default function EnablePwa() {
  useEffect(() => {
    if ('serviceWorker' in navigator) {
      navigator.serviceWorker
        .register('/service-worker.js')
        .then(() => console.log('서비스 워커 등록 완료'))
        .catch((err) => console.error('서비스 워커 등록 실패', err));
    }
  }, []);

  return <></>;
}
- "use client";를 추가하여 클라이언트에서만 실행되도록 설정한다.
- navigator.serviceWorker.register()를 사용하여 서비스 워커를 등록한다.
- apps/layout.tsx
import './globals.css';

import type { Metadata } from 'next';
import localFont from 'next/font/local';
import React from 'react';

import EnablePwa from './components/EnablePwa';

/** 생략 **/

export default function RootLayout({
  children,
}: Readonly<{
  children: React.ReactNode;
}>) {
  return (
    <html lang="ko">
      <body className={`${geistSans.variable} ${geistMono.variable}`}>
        {children}
        <EnablePwa />
      </body>
    </html>
  );
}
위와 같이 분리한 EnablePwa 컴포넌트를 연결할 수 있다.
✅ beforeinstallprompt 이벤트를 감지해서 앱 설치 버튼 만들기
크롬 주소창 옆의 앱 설치 버튼이 자동으로 보이지 않을 경우, 직접 설치 버튼을 만들 수도 있다.
- components/InstallButton.tsx
"use client";

import { useEffect, useState } from "react";

export default function InstallButton() {
  const [deferredPrompt, setDeferredPrompt] = useState<any>(null);

  useEffect(() => {
    const handler = (event: Event) => {
      event.preventDefault();
      setDeferredPrompt(event);
    };
    window.addEventListener("beforeinstallprompt", handler);

    return () => window.removeEventListener("beforeinstallprompt", handler);
  }, []);

  const installApp = () => {
    if (deferredPrompt) {
      deferredPrompt.prompt();
      deferredPrompt.userChoice.then((choiceResult: any) => {
        if (choiceResult.outcome === "accepted") {
          console.log("사용자가 앱을 설치함");
        } else {
          console.log("사용자가 설치를 취소함");
        }
        setDeferredPrompt(null);
      });
    }
  };

  return deferredPrompt ? <button onClick={installApp}>앱 설치</button> : null;
}
- beforeinstallprompt 이벤트를 감지하여 설치 버튼을 직접 구현할 수 있다.
- deferredPrompt.prompt()를 실행하면 설치 창을 강제로 띄울 수 있다.
이제 Next.js 15 App Router 환경에서 PWA가 정상적으로 동작하도록 설정을 완료했다 !~
크롬에서 정상적으로 인식되면 주소창 옆에 "앱 설치 아이콘 / 앱에서 열기" 버튼이 나타난다.


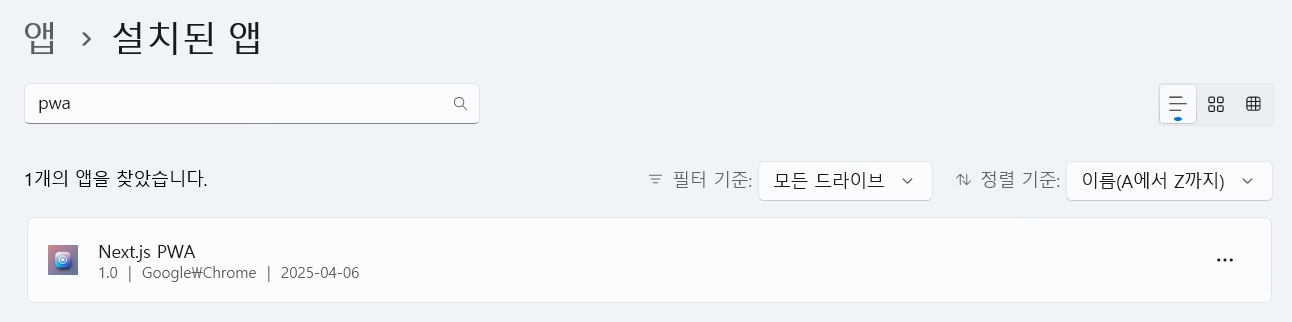
pwa 앱을 설치하면, 이렇게 윈도우 설치된 앱에서 확인할 수도 있고 여기서 제거할 수도 있다.
pwa는 많은 서비스 기업들에서 사용하는 기술이므로, 알아두면 좋은 것 같다 🤗
+ 푸시 이벤트를 만드는 방법도 추가로 알아보았다 🥧
일단, 기존에 작성한 코드인 service-worker.js에 다음과 같은 푸시 이벤트를 추가한다.
self.addEventListener("push", function (event) {
  const data = event.data?.json() || {};
  const title = data.title || "알림!";
  const options = {
    body: data.body || "알림 내용입니다.",
    icon: "/icon-192x192.png",
  };

  event.waitUntil(
    self.registration.showNotification(title, options)
  );
});
푸시 알림 테스트를 위해서 apps/components/PushTestPwa.tsx에 다음과 같이 컴포넌트를 작성해준다.
'use client';

import { useEffect, useState } from 'react';

type NotificationPermission = 'default' | 'denied' | 'granted';

export default function PushTestPwa() {
  const [permission, setPermission] = useState<NotificationPermission | null>(null);

  useEffect(() => {
    // 브라우저 환경에서만 접근
    if (typeof window !== 'undefined' && 'Notification' in window) {
      setPermission(Notification.permission);
      console.log('Notification permission:', Notification.permission);
    }
  }, []);

  const handlePush = async () => {
    if (!('Notification' in window) || !navigator.serviceWorker) {
      alert('이 브라우저는 알림을 지원하지 않습니다.');
      return;
    }

    if (permission !== 'granted') {
      const result = await Notification.requestPermission();
      setPermission(result);

      if (result !== 'granted') {
        alert('알림 권한이 거부되었습니다.');
        return;
      }
    }

    const reg = await navigator.serviceWorker.ready;

    reg.showNotification('✅ 알림 테스트', {
      body: 'PWA에서 보낸 푸시 알림입니다.',
      icon: '/icon-192x192.png', // 실제 존재하는 경로!
    });
  };

  return <button onClick={handlePush}>🔔 푸시 알림 테스트</button>;
}
apps/layout.tsx에 다음과 같이 코드를 추가하고 테스트해보자
import './globals.css';

import type { Metadata } from 'next';
import localFont from 'next/font/local';
import React from 'react';

import EnablePwa from './components/EnablePwa';
import PushTestPwa from './components/PushTestPwa';

export default function RootLayout({
  children,
}: Readonly<{
  children: React.ReactNode;
}>) {
  return (
    <html lang="ko">
      <body className={`${geistSans.variable} ${geistMono.variable}`}>
        {children}
        <EnablePwa />
        <PushTestPwa />
      </body>
    </html>
  );
}
설정을 하고 나면, 다음과 같이 크롬 브라우저에서 알림을 받을건지 묻는 창이 뜬다
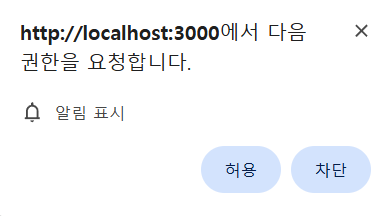
허용을 하고 푸시 테스트 버튼을 눌러보자 🦆
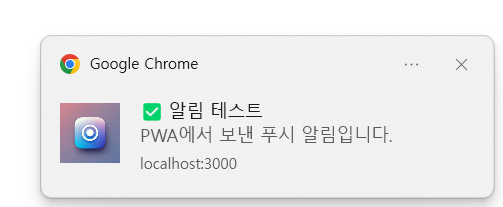
요렇게 아이콘을 포함해서 알림이 잘 뜨는것을 확인할 수 있다.
참고로, 알림 기능의 전제조건은 secure 환경인데, https에서만 작용한다고 한다.
그래서 추후 https를 연결하여 테스트해보기로 하였다. (http지만 localhost에서는 테스트를 위해서 된다고 하는 것 같다)
🫘 참고로 알림기능은 ios에서 지원하는 버전을 확인해야 한다고 한다.
🤭 그리고 실제 서비스에서 푸시 기능은 실제 푸시는 Firebase Cloud Messaging (FCM)이나 Web Push Protocol 연동이 필요하다.
실제 작성한 예제 코드 🍍
https://github.com/citron03/practice-next-15/commit/de98e1469cd317782316845623cd43d3685b120b
feat(pwa): init pwa next.js app · citron03/practice-next-15@de98e14
"eslint.validate": ["javascript", "typescript", "javascriptreact", "typescriptreact"],
github.com
알림 코드는 다음이다.
https://github.com/citron03/practice-next-15/commit/122ac5adaec784a7712c78ec4a3d70096b2a35c9
feat(pwa): add pwa notification settings · citron03/practice-next-15@122ac5a
@@ -10,3 +10,14 @@ self.addEventListener('install', (event) => {
github.com
https://github.com/citron03/practice-next-15/commit/074d5e0b29294592b20a74acb2b9d0adf719690b
fix(pwa): missing offline.html add · citron03/practice-next-15@074d5e0
@@ -35,7 +35,7 @@ export default function PushTestPwa() {
github.com
♥️ 참고자료
https://developer.mozilla.org/en-US/docs/Web/Progressive_web_apps
Progressive web apps | MDN
A progressive web app (PWA) is an app that's built using web platform technologies, but that provides a user experience like that of a platform-specific app.
developer.mozilla.org
Building a Progressive Web App (PWA) with Next.js Without External Libraries
Progressive Web Apps (PWAs) offer an enhanced user experience with features like offline access and easy installation. In this tutorial…
medium.com
https://medium.com/@vedantsaraswat_44942/configuring-push-notifications-in-a-pwa-part-1-1b8e9fe2954
Configuring Push Notifications in a PWA ( Part — 1 )
Push notifications are extensively employed by advertisers and companies to engage with individuals about their ongoing or upcoming…
medium.com
'웹 개발' 카테고리의 다른 글
| vite 플러그인 만들기 (with 간단한 예제 & vite-plugin-pages 분석) 😊 (0) | 2025.03.18 |
|---|---|
| stylelint 🎨 스타일에도 린트 적용하기 (0) | 2025.03.01 |
| Next에서 더 효과적인 modal 개발하기 (Parallel Routes & Intercepting Routes) 😎 (0) | 2025.02.21 |
| pnpm patch를 사용해서 노드 모듈 수정하기 (patch-package 에러 발생 😭) (0) | 2025.02.05 |
| JS 개발 환경에서 커밋 컨벤션 강제하기 (Conventional Commits with commitlint 👻) (0) | 2025.01.31 |